Do you want to protect fans of your website from the theft of personal data and go to the SERP top? Ensure the integrity of information using HTTPS, which is now an industry standard for every popular online resource. In the first place, the website should be transferred if it has visitors leaving super-important data (for example, payment) that fraudsters can intercept. A secure protocol is a must-have for self-respecting online services, banks, online stores.
What is HTTPS?
Google defines it as:
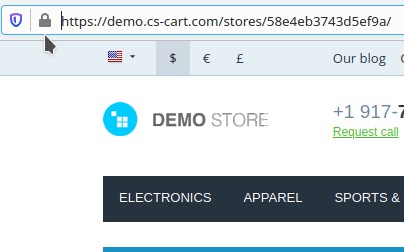
HTTP—hypertext transfer protocol—is the technical means by which our browsers connect to websites. HTTPS is an encrypted HTTP connection, making it more secure. You can tell if your connection to a website is secure if you see HTTPS rather than HTTP in the URL. Most browsers also have an icon that indicates a secure connection—for example, Chrome displays a green lock.
Why does HTTPS matter?
The Web Dev community stands out three main aspects of switching to HTTPS:
HTTPS protects the integrity of your website
Intruders exploit every unprotected resource that travels between your website and users. The flow includes Images, cookies, scripts, HTML, – all this content is exploitable. Intrusions can happen at any point in the network, including a user’s machine, or a Wi-Fi hotspot.
HTTPS blocks misuse of your website
An unprotected HTTP request may reveal sensitive data about user behavior and identity. Employees may unintentionally disclose their health conditions just by reading unprotected medical articles.
HTTPS is the future of the web
The latest powerful web features, such as enabling offline app experiences with service workers, or building progressive web apps (PWA), require explicit permission from the user before executing. Many updated APIs such as the Geolocation API require permission to execute. HTTPS is an essential component of the permission workflows for both these new features and updated APIs.
How to migrate?
1. Verify SSL support by your hosting
Many hosts allow you to quickly add the received certificate using the control panel. If you can not manage on your own, you should write to support or hire someone for 30-60 minutes to do everything properly.
The current provider does not support SSL? Then, unfortunately, you will have to look for another one.
Note: changing the hosting and moving the site to HTTPS requires redirecting the old IP address to a new one.
2. Change internal links from absolute to relative
If the page downloaded through the encrypted connection contains the links to the HTTP pages, the browser notifies users of the deterioration of protection.
To avoid the problem of different protocols, you need to replace the absolute links with relative ones.
Links regardless of the domain name:
- – absolute;
- /content/ – relative.
Types of links, regardless of protocol:
- – full;
- //site.ru/content/ – relative.
The owner of the resource would select the last option – so you exclude the name of the protocol. Naturally, we are talking about internal links, you do not need to correct external links.
3. Fix media attachments
Preparing to change the protocol also implies working with presentations, videos, and pictures – they must be opened through a secure connection. All addresses must also be transformed into relative ones.
When downloading files from external sites, make sure that they support HTTPS, otherwise, it’s better to refuse using them. YouTube and Facebook widgets, as well as other services that allow you to use the content, have long been working on an extended protocol. Therefore, finding the necessary images and video files will not be a problem.
4. Fix external script connections
Check and, if necessary, correct URLs (change absolute to relative) in external scripts. This applies to rare services, while popular tools function through HTTPS.
Note! Multiple forum SEO experts recommend newcomers to apply HSTS technology – then the browser will request HTTPS-pages, even if the user enters in the HTTP. To use this, find the webserver with its support. However, the implementation of HSTS complicates the rollback procedure.
5. Acquire an SSL certificate
The digital certificate is the standard technology of protection in the Network, used for accident-free connection between the resource and the browser. Without it, you cannot configure HTTPS.
To obtain a certificate, you must make a request for its issuance, providing answers to a number of questions about the company and the domain. Upon successful completion of the operation, your server will create a public and private cryptographic key. The certificate stores information about the owner of the resource and the certification authority, the date of registration, and the validity period of the certificate.
6. Configure SSL on the server and hosting
How do I install HTTPS? Find the “Configuring SSL” section in your administration panel. Then, enter the certificate information from the site.crt file in the “SSL certificate (.crt)” field. If you have a bundle or ca-bundle, you must also add it to the box above. In the line “SSL key (private key)” you must specify the private key received together with the digital certificate. This algorithm works when you configure a certificate issued by a certification authority.
Installation of a self-written or automated version on many hosting services is even easier: just fill out the form or submit a request, then click “Save” (or “Install”).
7. Check if the SSL installation was correct
To analyze if your SSL works correctly use a free SSL Server Test. Enter the domain name and click on “Submit”. After this, the online service will evaluate the security connection settings and provide recommendations based on the identified problems.
If SSL Checker has detected problems with installing root and intermediate certificate or with a server configuration, you need to resolve them urgently.
8. Verify site public availability via HTTPS protocol
After installing a digital certificate, make sure that the resource is available at http:// and https://. When identifying a problem, immediately look for and eliminate its cause.
Did you see an inscription with an exclamation mark in the yellow triangle? That means that the site has mixed content, that is, links in the text and media files with HTTP. In this case, try to correct the situation yourself (by changing links from absolute to relative). You can contact the provider who gives you the SSL certificate for help.
read more about the right way of migration from HTTP to HTTPS…
HTTPS Migration Checklist
1. Update internal links to pages on your site – all of them must start with https://
2. Make sure that all external links lead to the updated pages of your site with HTTPS.
3. Check all occurrences of the IMG/CSS/JS tags in your code – they must start with https://.
4. Make sure that you have specified 301 redirects. These are the redirects that are used when moving to HTTPS.
5. Make sure that you have protected the whole site, not just one of its elements (login page, order goods page, etc.).
6. Check the canonical links. All links with rel = canonical should lead to your new HTTPS pages.
7. Make sure that your CDN-provider supports HTTPS (today almost all CDN-providers have such support).
8. Set up HTTPS in Google Search Console. A site with HTTPS must be added as New Property in Search Console. Do not forget to reload the Disavow file.
9. Open the indexing of your HTTPS pages if it was closed earlier.
10. Send an updated sitemap.xml with HTTPS URLs to Search Console so that Google can better index your site.
11. Keep track of the traffic on your new site. Initially, the traffic will drop while the transition to HTTPS, but later it will normalize and enter new, higher positions.
Switching to HTTPS with Simtech
Our hosting team has already installed and configured SSL certificates for our projects via HTTPS. You just need to enable a secure connection in the administration panel of your CS-Cart or Multi-Vendor store.
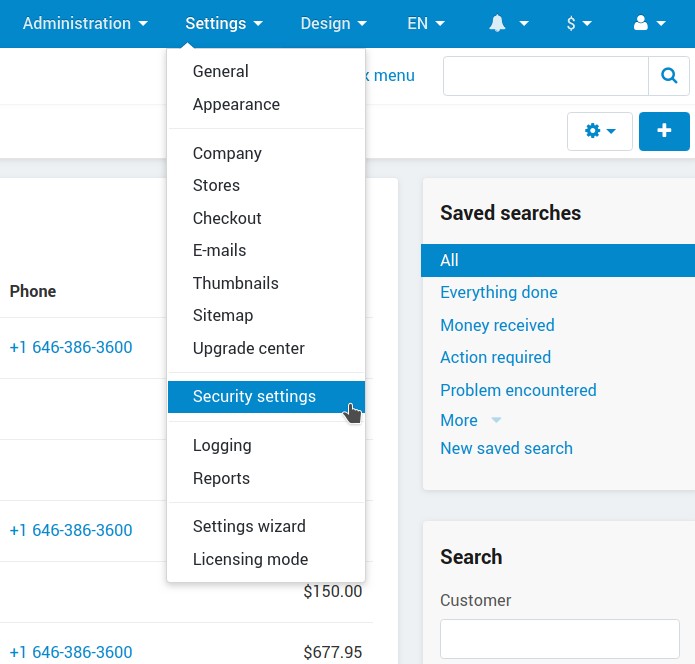
Step #1. Log in to the administration panel of your CS-Cart or Multi-Vendor store. Navigate to Settings > Security settings.

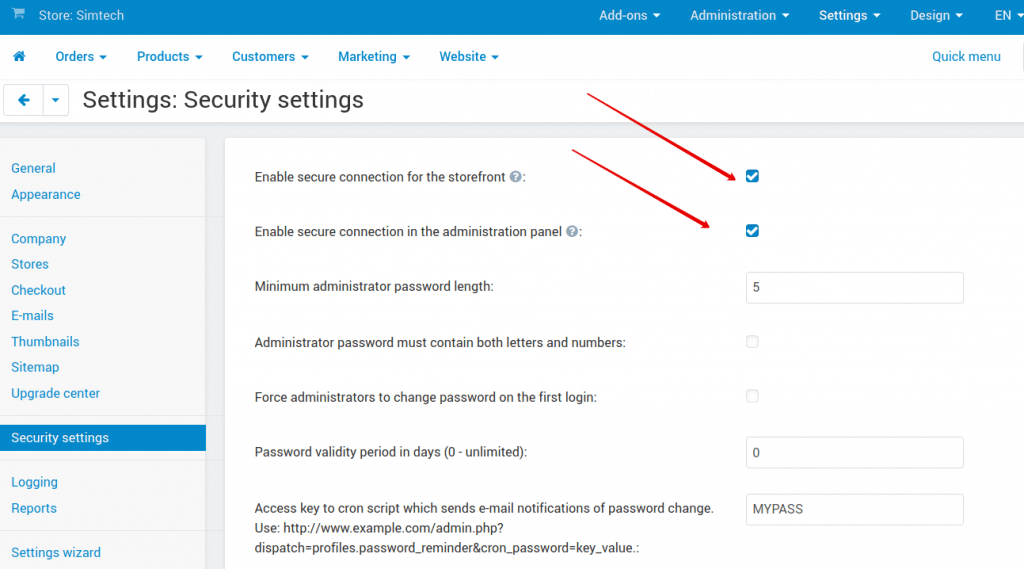
Step #2. Enable HTTPS connection for the entire site and admin panel.

Step #3. Done. Check the storefront.

Closing
Do not postpone the transition to HTTPS until better days, because in this case they just will not come: you will only see positions sagging and the decrease in the trust of your target audience. Start migration to Cloud hosting by sending us a request.
